|
All Scenery Download files are ZIP files and contain the relevant scenery
and AI aircraft for that particular pack. (1) - Download the zip file
and then unzip into your FS2004
directory - the zip file is already structured to add the relevant scenery
to the Addon Scenery directory and the
AI aircraft to the Aircraft directory
- but will only work correctly if you unzip into the FS2004 directory.
Scenery in the Addon Scenery directory will not automatically add
itself to the FS2004 environment therefore it is necessary to add scenery
through a set process of a few simple steps: |
|
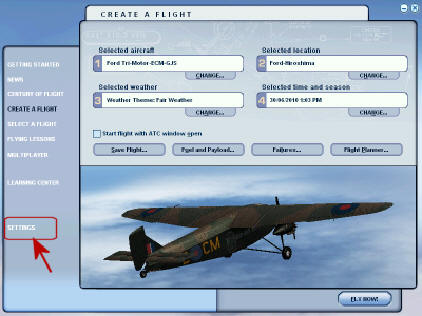
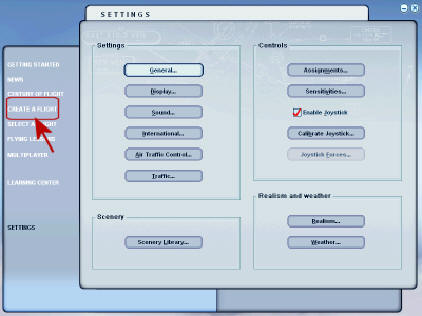
Step 1
Run your FS2004 program
When it has started then select the:
SETTINGS button and click on it. |
 |
|
Step 2
Select the:
Scenery Library... button and click on it. |
 |
|
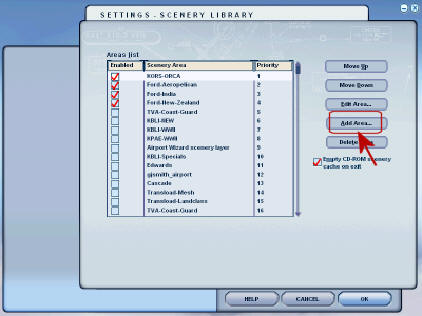
Step 3
Select the:
Add Area... button and click on it. |
 |
|
Step 4
A directory screen will appear - click on Addon Scenery directory then
click on the OK button |
 |
|
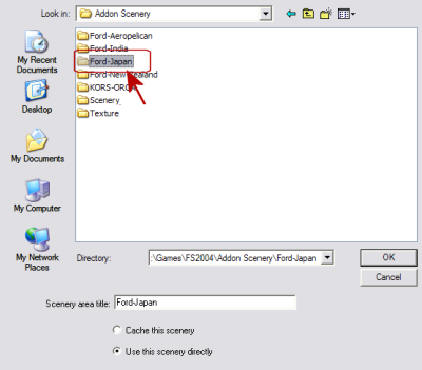
Step 5
A directory screen will appear which contains the scenery directories
you have added to the simulator.
Using the example Ford-Japan - click on that directory then click
on the OK button. |
 |
|
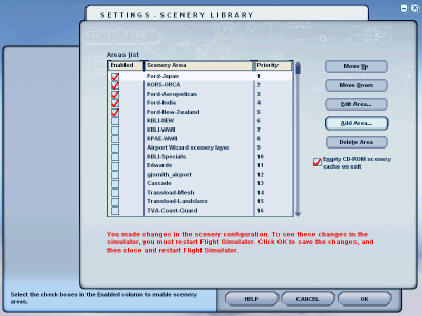
Step 6
This will add the Ford-Japan (or whichever scenery you have chosen) to
the top of the Areas List.
It will also highlight in red at the bottom of the form that new
scenery has been added and that the simulator must be restarted to bring
that scenery into effect within the simulator. |
 |
|
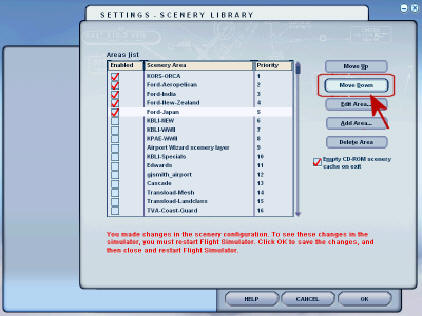
Step 7 It is very important that the position of the added Ford scenery is below
the KORS-ORCA scenery. Assuming you have installed it previously.
To move the Ford-Japan below the KORS-ORCA scenery use the Move Down
button to position the Ford-Japan below the KORS-ORCA position.
Remember no matter where you place the KORS-ORCA scenery all other Ford
Scenery must be below KORS-ORCA
When finished adding scenery then click
on the OK button to return to Settings Screen.
If you want to do multiple adds at this time repeat the steps (3,4,5,6,7) above to add
the new ones and position them in a suitable order using the
Move Down/Move Up buttons. |
 |
|
Step 8
Click on the:
CREATE A FLIGHT button to return to the normal start point for your
simulation use. |
 |
|
Step 9 Now we are back to the Normal spot for starting the simulator.
It is
very important to now click on the exit button so that we can restart and
load the scenery.
After exiting - reload FS2004 and it will load up the scenery that we
have added.
THIS IS A ONCE ONLY PROCESS - YOU DO NOT NEED TO DO THESE STEPS
TO ADD THIS SCENERY AGAIN.
Every time the simulator loads from now on the added scenery is
automatically a part of your simming environment. |
 |
|
Recommended
Scenery Install Order
* KORS-ORCA - is the principle objects and texture
sets for all Ford Scenery (Must be First of all Ford Scenery listings)
# Ford-Factory - is the Feature Scenery - contains many Ford Specific
Models and textures. (Must be Second of all Ford Scenery listings)
Scenery install structure below Ford-Factory are listing
simply in order of creation - as long as KORS-ORCA and Ford Factory are
above the subordinate Scenery files then everything will work correctly.
|
KORS-ORCA *
Ford-Factory #
Ford-India
Ford-New-Zealand (2 Airfields)
Ford-Aeropelican
Ford-Blue-Mountains
Ford-Japan
Ford-Egypt
Ford-Singapore
Ford-Hoover
Ford-Stonehenge
Ford-China
Ford-Switzerland
Ford-Konigsberg
Ford-Danzig
Ford-Brazil
Ford-Panama
Ford-Moscow
Ford-City-Cape-Town
Ford-Alaska
Ford-Gibraltar
Ford-Fordlandia
Ford-Stag Lane
Ford-Blackhawk-Project |
|
Happy simming, Edward and I hope that you enjoy
the scenery and the Ford Project.


|